Emulating a Networked Control System
Emulations of Networked Control Systems in CLEAVE are centered around two core concepts: Plants and Controller Services. These terms follow the terminology used in Control Systems research: Plants are physical systems we wish to control, whereas Controller Services are the computational elements which perform the necessary computations for the controlling of Plants. CLEAVE provides an easy-to-use API to implement these components, and abstracts away the network code, allowing researchers to focus on the NCS itself.
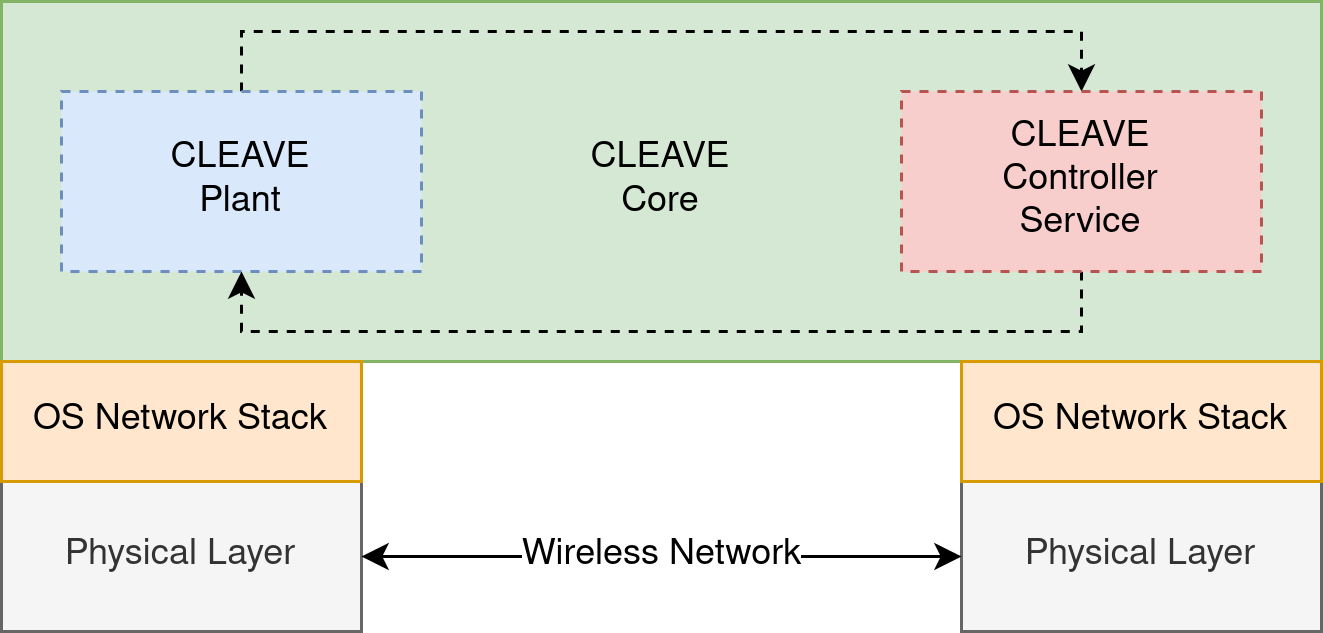
General overview of CLEAVE’s design.
In practical terms, the definitions of Plants and Controller Services are done through configuration files written in pure Python. These are then executed using the cleave.py launcher script. A couple of of such configuration files can be found under the examples/ directory, and we will discuss them in more detail in Deploying the included NCS emulations.
To execute a Plant, use the run-plant sub-command and provide a Plant configuration file:
(venv) $ python cleave.py run-plant examples/plant_config.py
To execute a Controller Service, use the run-controller subcommand and provide a Controller Service configuration file.
(venv) $ python cleave.py run-controller examples/controller_config.py
Check cleave.py --help for more details and additional options. In particular, the -v|--verbose flag is very useful; it increases the verbosity of the logged output, and can be specified multiple times. Examples:
(venv) $ python cleave.py run-plant examples/plant_config.py
...
(venv) $ python cleave.py -vv run-plant examples/plant_config.py
2020-11-25T18:50:22.908532+0100 WARNING /mnt/data/workspace/CLEAVE/plant_metrics/simulation.csv will be overwritten with new data.
2020-11-25T18:50:22.909054+0100 WARNING /mnt/data/workspace/CLEAVE/plant_metrics/client.csv will be overwritten with new data.
2020-11-25T18:50:22.909384+0100 WARNING /mnt/data/workspace/CLEAVE/plant_metrics/sensors.csv will be overwritten with new data.
2020-11-25T18:50:22.909749+0100 WARNING /mnt/data/workspace/CLEAVE/plant_metrics/actuators.csv will be overwritten with new data.
2020-11-25T18:50:22.910301+0100 WARNING Target frequency: 200 Hz
2020-11-25T18:50:22.910360+0100 WARNING Target time step: 5.0 ms
...
Deploying the included NCS emulations
CLEAVE comes with a number of pre-configured NCS emulations, composed of a Plant simulating an inverted pendulum and a number of Controller Services that interact with this Plant and control the pendulum in different ways.
Inverted pendulum Plant
The examples/inverted_pendulum/plant/ directory contains the configuration files for the inverted pendulum Plant. Currently, this directory contains two files: config.py and config_with_viz.py. These files define identical Plant simulations, except for the fact that the latter includes a graphical visualization of the Plant in realtime.
Please refer to Configuring the Plant for details on customizing the Plant configurations, and to cleave.impl.inverted_pendulum for the actual implementations of the Plants.
Inverted pendulum Controller Services
Controller Services for the inverted pendulum NCS can be found under examples/inverted_pendulum/controller/. See each file for details on each Controller Service.
Please refer to Configuring the Controller Service for details on customizing the Controller Service configurations, and to cleave.impl.inverted_pendulum for the actual implementations of the Controllers.
Building a NCS emulation from scratch
In the following sections we will explain how to set up NCS emulations in CLEAVE by developing and configuring Plants and Controller Services from scratch and connecting them.
Plants
These are the representations of the physical systems wich we want to control. Plants in CLEAVE are usually physical simulations of some system we wish to monitor and act upon. Correspondingly, a Plant is composed of three sub-components:
A
State, which implements the discrete-time behavior of the simulated system.A collection of
Sensorobjects, which measure specific properties of theState, potentially transforming them, and send them to the Controller Service.A collection of
Actuatorobjects, which receive inputs from the Controller Service, potentially transform or distort them, and finally act upon specific properties of theState.
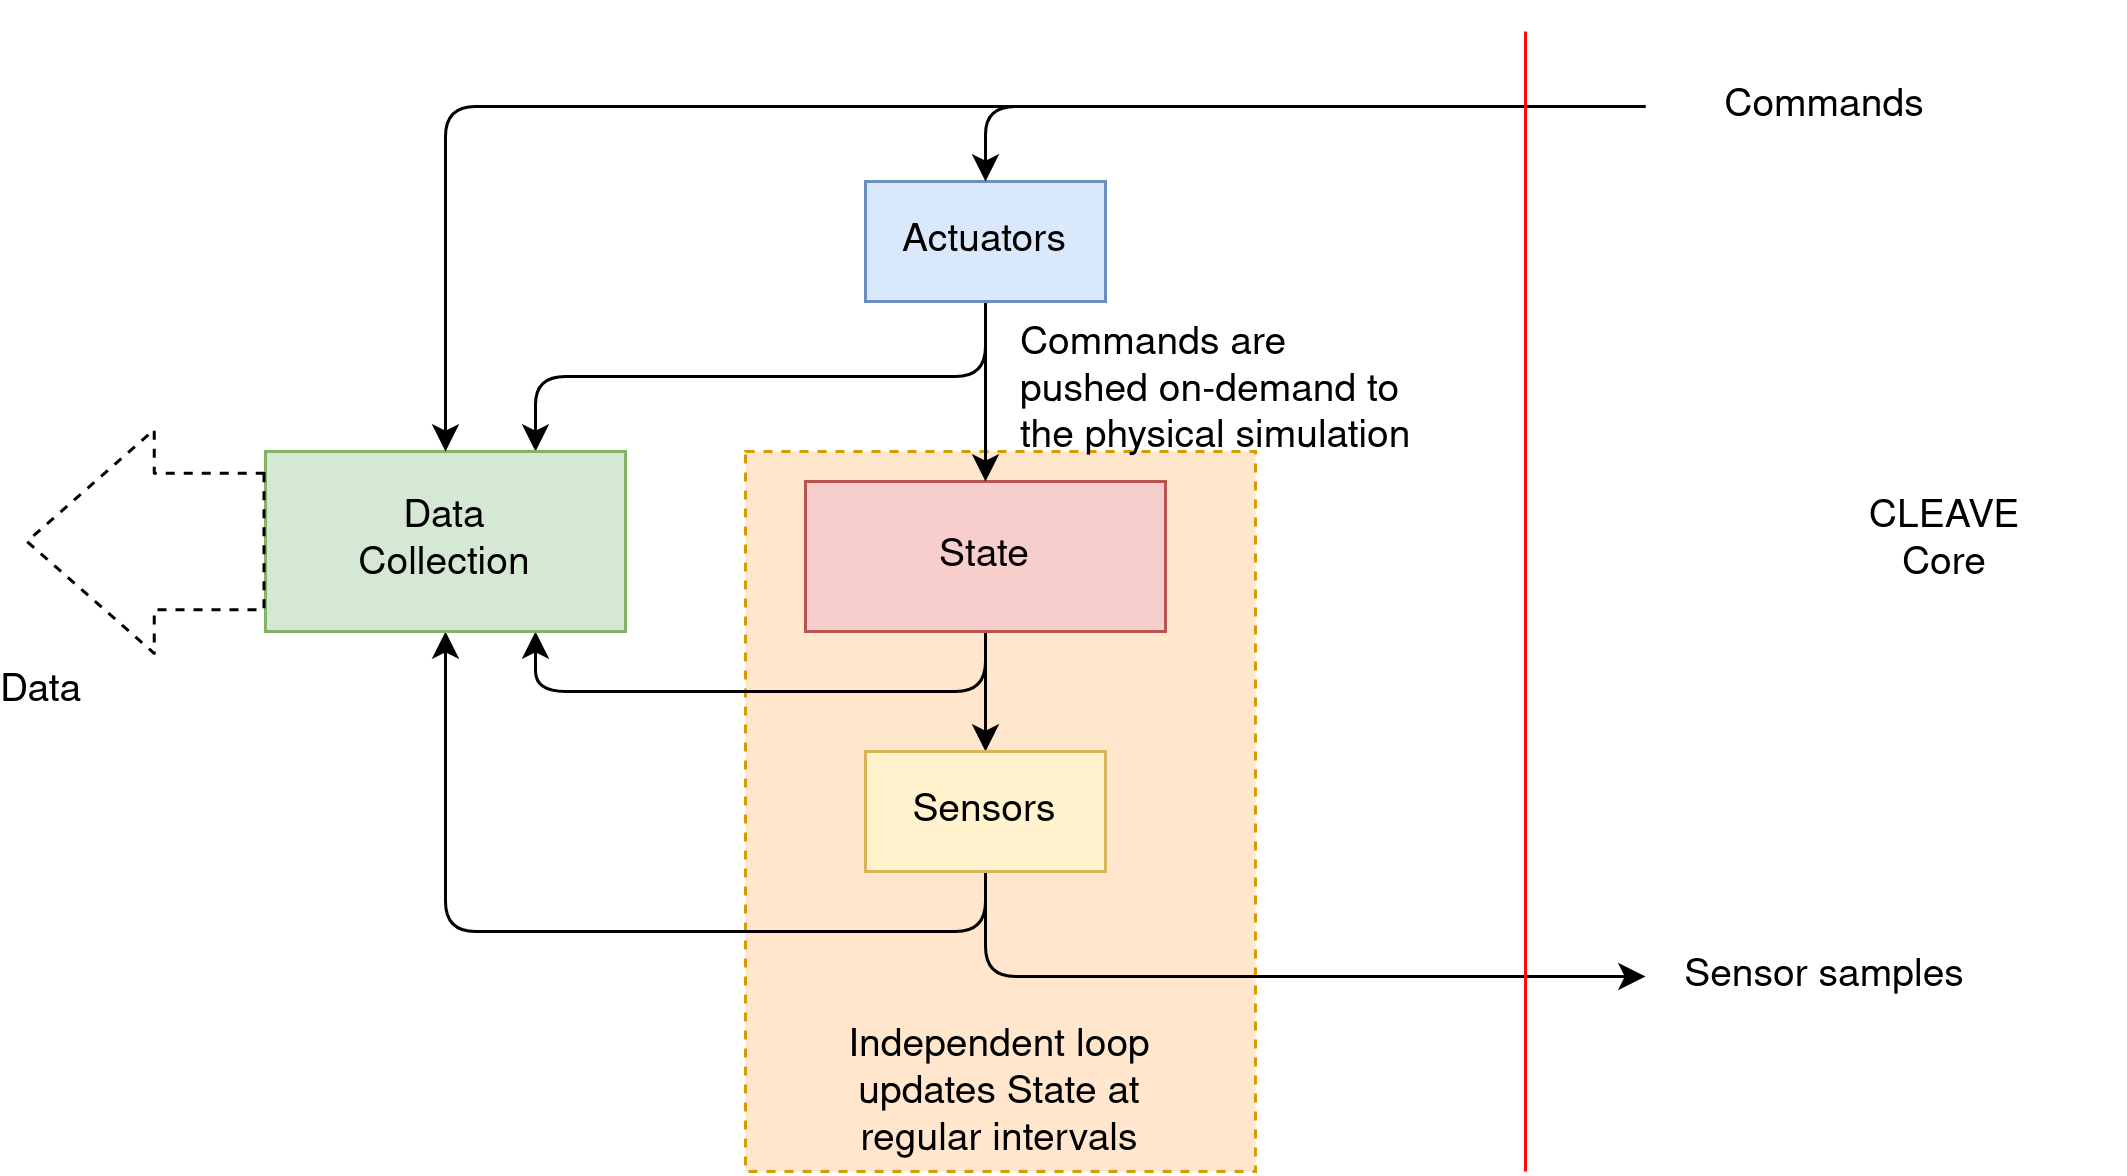
General overview of the structure of, and flow of data in a Plant in CLEAVE.
State
State objects in CLEAVE are simply instances of classes which extend from the abstract base class cleave.api.plant.State. This base class defines a single required method as well as two optional ones:
class State:
    @abstractmethod
    def advance(self, dt: float) -> None:
        ...

    def initialize(self) -> None:
        ...

    def shutdown(self) -> None:
        ...
The cleave.api.plant.State.advance() method must be extended by inheriting classes. It is called by the framework on every iteration of the simulation, and thus users should implement their discrete-time plant logic here. The parameter dt corresponds to the number of seconds elapsed since the last invocation of the method.
Methods cleave.api.plant.State.initialize() and cleave.api.plant.State.shutdown() can optionally also be extended or overridden. They are called by the framework at the very beginning of the Plant execution and right before shutdown, respectively. It is in these methods users should put their initialization and shutdown logic.
State objects also need to expose the properties which that will be provided as inputs to the Controller and the properties the Controller acts upon. This is done by defining special semantic variables in the constructor of the State:
cleave.api.plant.SensorVariableobjects represent properties that will be measured by sensors and subsequently pushed to the Controller Service.cleave.api.plant.ActuatorVariableobjects represent properties that will be modified by the actuation commands generated by the Controller Service. The values of these variables will be directly modified by the framework as commands come in.cleave.api.plant.ControllerParameterobjects represent parameters passed to the Controller Service at the beginning of the emulation (WIP, not implemented yet).
These objects are simply used to track the values during execution, and thus are completely transparent, allowing unrestricted access to the underlying raw values at all times. This means that after initialization, these variables can simply be used as normal “raw” values without having to consider the semantic variable object around it.
Furthermore, an optional “sanity check” may be attached to each semantic variable. This simply corresponds to a callable which receives the current value of the semantic variable and returns a boolean indicating if the current value is within acceptable ranges or not. This check will be executed at each time step of the Plant simulation, and if it at any point returns False the framework will record the corresponding variable and then halt the emulation.
An example skeleton of a State with a single input variable and a single output variable could then look something like the following:
class ExampleState(State):
    def __init__(self):
        super(ExampleState, self).__init__()

        self.accel = ActuatorVariable(0.0)
        self.speed = SensorVariable(0.0, sanity_check=lambda s: s < 200.0)
        # shuts down if speed ever exceeds 200.0 m/s

    def advance(self, dt: float) -> None:
        # To update the state, we simply read the ActuatorVariable, as it will always
        # hold the latest value from the controller at the beginning of each timestep,
        # and we write to the SensorVariable, as its value will automatically be sampled
        # by the corresponding Sensor.

        self.speed += dt * self.accel
As mentioned in Deploying the included NCS emulations, more complex example implementations of State classes representing Inverted Pendulum systems are included in the module cleave.impl.inverted_pendulum.
Sensors
Similarly to State, a Sensor in CLEAVE corresponds to an object instance of a subclass of cleave.api.plant.Sensor implementing the required method cleave.api.plant.Sensor.process_sample(). The cleave.api.util.PhyPropType typing variable in the signature simply represents the type of variables that can be measured in a Plant, currently int, float, bool and bytes.
class Sensor:
    def __init__(self, prop_name: str, sample_freq: int):
        ...

    @abstractmethod
    def process_sample(self, value: PhyPropType) -> PhyPropType:
        ...
As can be observed above, the Sensor base class constructor takes two parameters:
prop_name: Corresponds to a string holding the name of the semantic variable theSensorsamples from.sample_freq: An integer representing the sampling frequency of thisSensorin Hz.
Sensor objects in the framework can be conceptualized as attaching to a semantic variable defined in the State. Whenever it is time for the Sensor to sample the value of this variable, process_sample(value) is called with its latest value, and whatever is returned is passed on to the Controller Service. Thus, users should extend process_sample(value) with any procedure to add noise or distortion to the measured variable they desire.
An example simple Sensor class which simply adds a bias to the measured value could be implemented as follows:
class BiasSensor(Sensor):
    def __init__(self, bias: float, prop_name: str, sample_freq: int):
        super(BiasSensor, self).__init__(prop_name, sample_freq)
        self._bias = bias

    def process_sample(self, value: PhyPropType) -> PhyPropType:
        return value + self._bias
Actuators
Actuator objects follow a similar logic as Sensor objects, in the sense that they “attach” to a semantic variable in the State and modify its value at each iteration following commands from the Controller Service.
In practical terms, Actuator objects correspond to instances of subclasses of cleave.api.plant.Actuator:
class Actuator:
    def __init__(self, prop_name: str):
        ...

    @abstractmethod
    def set_value(self, desired_value: PhyPropType) -> None:
        ...

    @abstractmethod
    def get_actuation(self) -> PhyPropType:
        ...
Again, the prop_name parameter in the constructor corresponds to the name of the semantic variable the Actuator attaches to. The cleave.api.plant.Actuator.set_value() and cleave.api.plant.Actuator.get_actuation() methods correspond to the required methods users should implement:
set_value(self, desired_value: PhyPropType) -> Nonewill be called by the framework whenever a new value for the actuated semantic variable is received from the Controller.get_actuation(self) -> PhyPropTypewill be called by the framework at the beginning of each simulation time step.
Note that due to the fact that commands from the Controller Service are received asynchronously, there are no guarantees regarding the order in which set_value() and get_actuation() are called with respect to each other. In fact, depending on the frequency of the plant simulation updates, the sensor sampling rates, network latency, and/or the time the Controller takes to process each input, either of these methods may be called multiple repeated times before the other. Users need to account for this when implementing new Actuator classes.
CLEAVE includes implementations for a number of different Actuator subclasses. For example, cleave.api.plant.SimpleConstantActuator implements an Actuator which remembers the last value set by the Controller Service and applies it on every simulation time step. This can be thought of as, for instance, an electrical motor maintaining a specific RPM until explicitly changed:
class SimpleConstantActuator(Actuator):
    def __init__(self, initial_value: PhyPropType, prop_name: str):
        super(SimpleConstantActuator, self).__init__(prop_name)
        self._value = initial_value

    def set_value(self, desired_value: PhyPropType) -> None:
        self._value = desired_value

    def get_actuation(self) -> PhyPropType:
        return self._value
Configuring the Plant
As discussed before, setting up Plants in CLEAVE is done through the use of configuration files written in pure Python. These configuration files may contain any valid Python code, be split up into multiple files, and even use external libraries. The only requirement is that the following top-level variables are defined:
host: String containing the IP address of the Controller Service.port: Integer representing the UDP port on which the Controller Service is listening.tick_rate: Integer representing the update frequency of the Plant in Hertz. In other words, this number represents the number of iterations per second of the discrete-time simulation involving theState.State: A variable pointing to a valid instance of a subclass ofState.sensors: A collection (list, tuple, set, etc) of instances of subclasses ofSensor.actuators: A collection of instances of subclasses ofActuator.(Optional)
output_dir: This string should contain a path to a directory where the output metrics of the Plant will be written to (see Plant output files for details on the output files). If omitted, this variable defaults to./plant_metrics/.
Putting together our examples from the previous subsections, an example configuration file for the simple dummy ExampleState discussed previously would look something like the following:
Simulation of the Plant can then be initialized using the cleave.py launcher script:
(venv) $ python cleave.py run-plant dummy_plant_config.py
...
Plant output files
TODO
Controller Services
As discussed previously, a Controller Service correspond to the element in the NCS emulation which implements the necessary logic and computations to achieve the desired control of the Plant. In CLEAVE, Controller Services are implemented as stateful microservices paired with a specific Plant that receive samples of the Plant State semantic sensor variables over a UDP socket and return new values for the State semantic actuator variables over the same socket. Controller Services currently have a single user-defined component: a Controller which implements the control strategy.
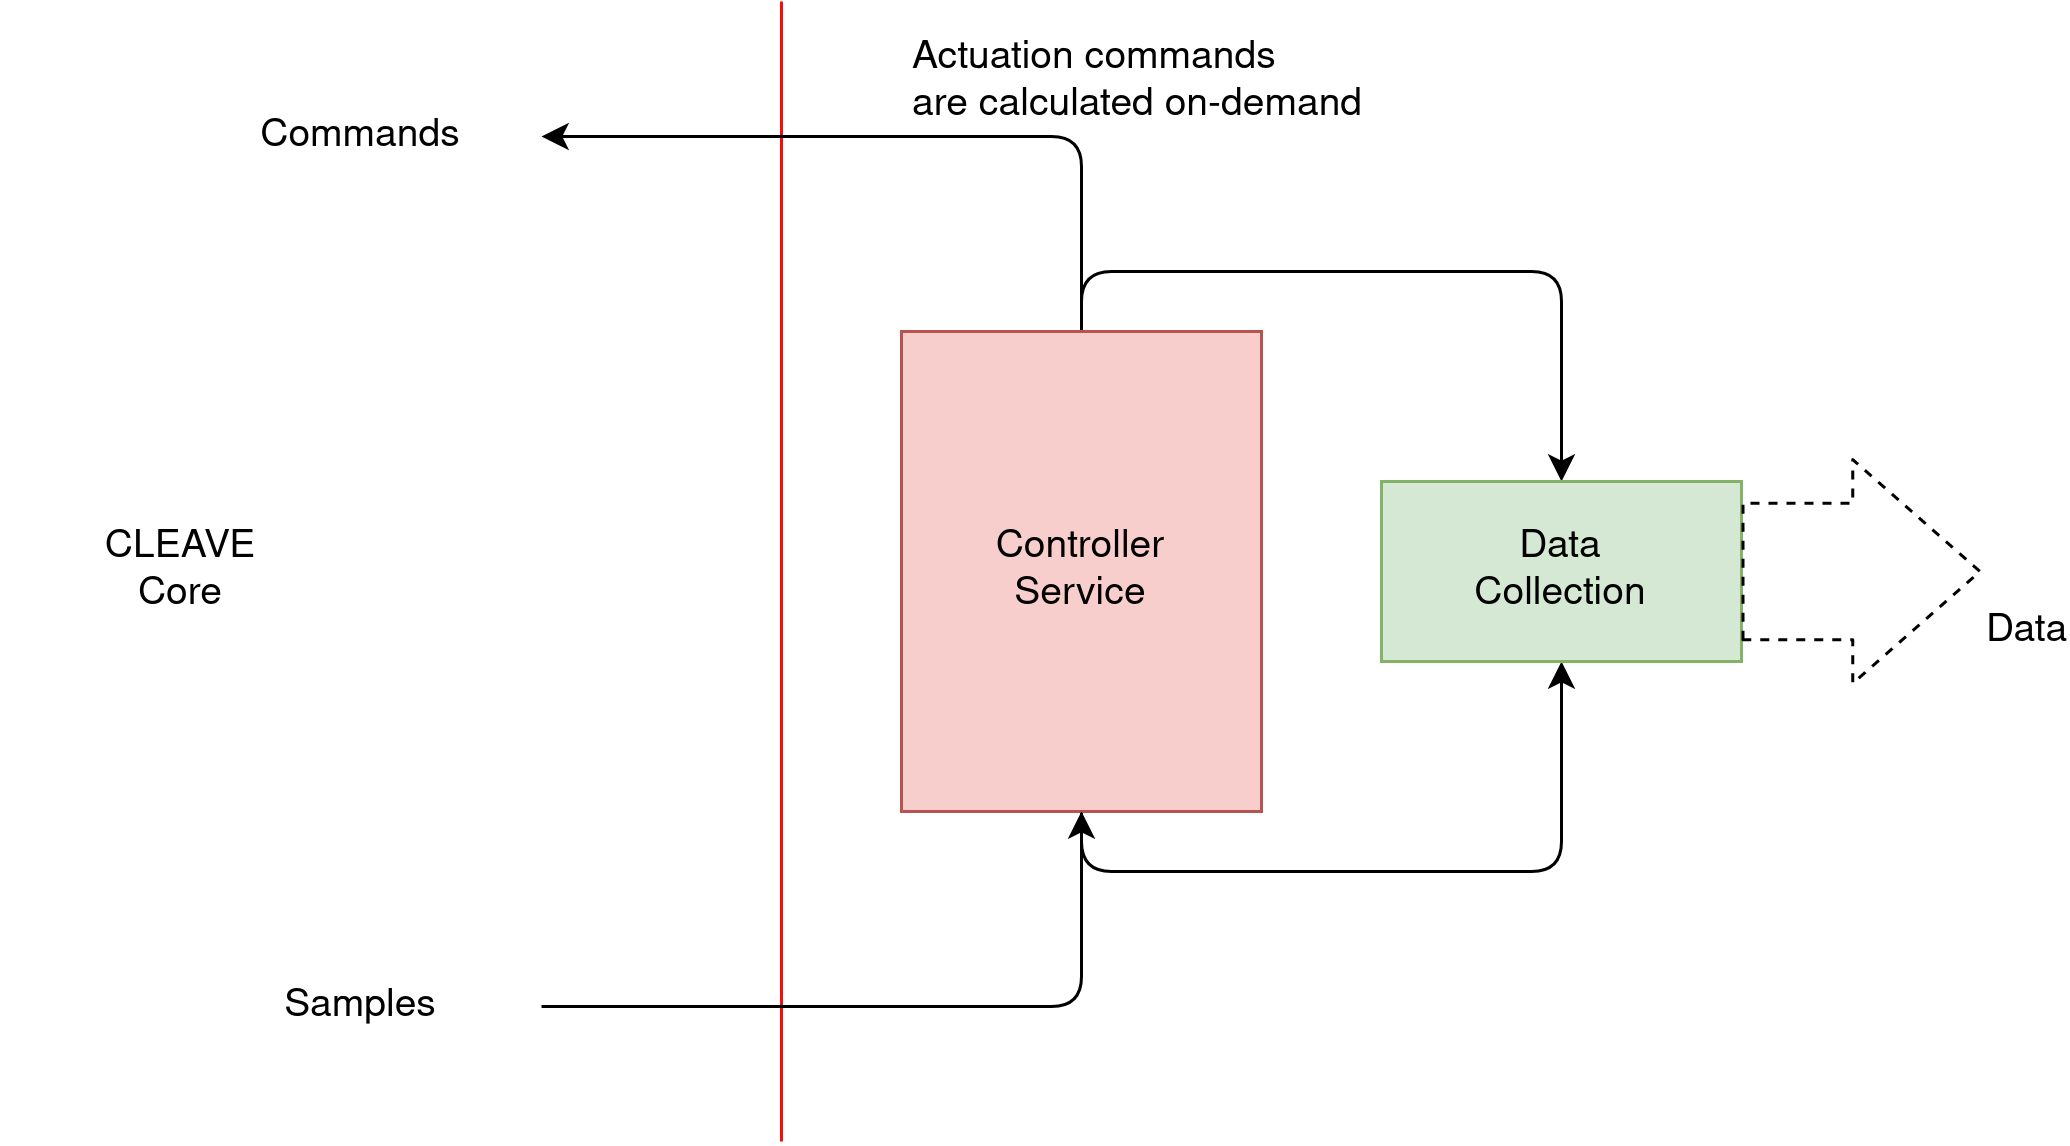
General overview of the structure of, and flow of data in a Controller Service in CLEAVE.
Controllers
In practical terms, Controller objects are instances of subclasses of cleave.api.controller.Controller:
class Controller:
    @abstractmethod
    def process(self, sensor_values: PhyPropMapping) -> PhyPropMapping:
        ...
As seen above, this abstract base class defines a single required cleave.api.controller.Controller.process() method subclasses must implement. This method takes as argument a Mapping from sensor variable names to values, as is invoked whenever a new sample is received from the Plant. In turn, it must return a Mapping of actuator variable names to new values, which will subsequently be sent to the Plant.
Below we present an example Controller for our example Plant that operates on the speed and accel variables:
Configuring the Controller Service
Controller Service config files work the same way as Plant config files, the only difference being in the required top-level variables:
port: Integer defining the UDP port on which the Controller Service listens.controller: Variable pointing to a validControllerinstance.(Optional)
output_dir: This string should contain a path to a directory where the output metrics of the Controller will be written to (see Controller output files for details on the output files). If omitted, this variable defaults to./controller_metrics/.
The full example configuration file for our dummy Controller Service would then be:
Use cleave.py launcher script together with the config file to start listening for samples:
(venv) $ python cleave.py run-controller dummy_controller_config.py
...
Controller output files
TODO